A flat tire is one of the most common and frustrating roadside emergencies a driver can face. Whether it’s a puncture from a nail, gradual air loss due to underinflation, or a complete blowout, dealing with a flat can leave you stranded and stressed.
However, with the right knowledge and preparation, changing a flat tire doesn’t have to be a daunting task. This comprehensive guide will walk you through the step-by-step process of changing a flat, from identifying the issue to properly installing the spare. You’ll also learn crucial tips for tire maintenance and emergency preparedness to help prevent flats and handle them smoothly when they occur.
By the end of this guide, you’ll be equipped with the skills and confidence to tackle a flat tire like a pro. No more waiting for roadside assistance or trying to limp to the nearest tire shop – you’ll be back on the road in no time. So let’s dive in and make sure you’re “tire-ready” for whatever the drive ahead has in store.
Understanding Flat Tires: Causes and Identification
A flat tire is a common automotive issue that occurs when a tire loses its internal air pressure, causing the tire to become soft, bulge, or completely deflate. There are several common causes of flat tires, including punctures from nails, screws, or other sharp objects, as well as general wear and tear on the tire over time. Underinflation can also lead to a flat, as low tire pressure makes the tire more susceptible to damage.

Punctures are one of the most frequent culprits behind flat tires. Driving over a nail, screw, or other sharp object can create a hole in the tire, allowing air to slowly (or rapidly) escape. This is especially common in urban areas with construction or on roads littered with debris. Tires can also develop holes or cracks due to age, dry rot, or exposure to the elements over time.
Underinflation is another major cause of flats. When a tire is not properly inflated to the vehicle manufacturer’s recommended PSI (pounds per square inch), the tire becomes more vulnerable to damage. Driving on an underinflated tire generates excess heat, which can lead to a blowout or rupture. Regularly checking your tire pressure, including the spare, is crucial to prevent this issue.
To identify a flat tire, look for visual signs such as the tire appearing noticeably lower than the other tires, or feeling soft and spongy when you press on it. You may also hear a hissing sound indicating air is escaping. If you suspect a flat, it’s important to pull over to a safe location and inspect the tire further before attempting to change it.
One way to quickly diagnose a flat is to perform the “penny test.” Insert a penny into the tread groove with Lincoln’s head facing down. If you can see the top of his head, your tread depth is less than 2/32 of an inch and it’s time to replace the tire. Proper tread depth is crucial for maintaining traction and safety, especially in wet or wintry conditions.
Preparing to Change the Tire
Before you begin changing a flat tire, it’s important to gather the necessary tools and equipment. This typically includes a spare tire, a car jack, a lug wrench, and wheel chocks or blocks to stabilize the vehicle. Locate these items and ensure they are in good working condition.
The spare tire is, of course, the most crucial component. Make sure it is properly inflated to the correct PSI, which is usually listed on a sticker inside the driver’s side door jamb or in your owner’s manual. Inspect the spare for any visible signs of damage or excessive wear as well.
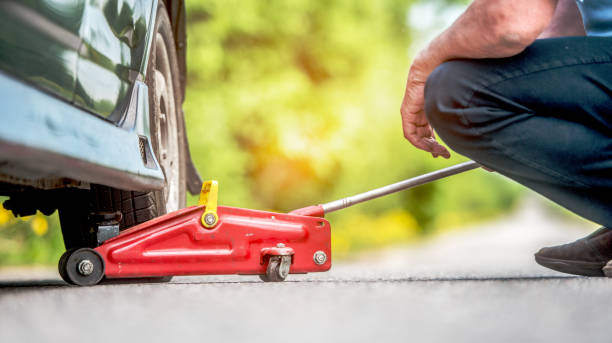
The car jack is used to lift the vehicle so you can remove the flat tire. Check that the jack is the right size and capacity for your vehicle. Ensure it is in good working order with no cracks or deformities that could compromise its structural integrity. Many modern jacks are hydraulic, which makes the lifting process easier, but a traditional mechanical jack can also get the job done.
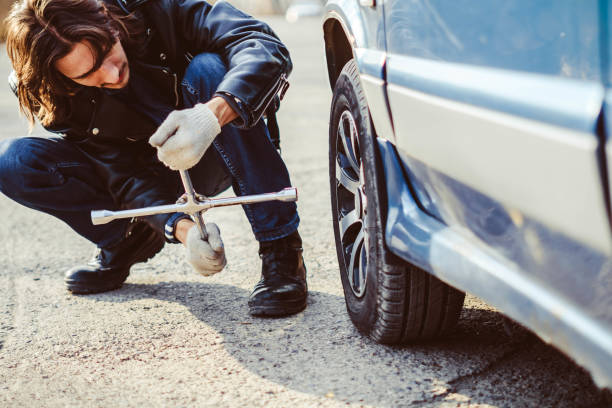
The lug wrench, also known as a tire iron, is used to loosen and tighten the lug nuts that secure the tire to the wheel hub. Make sure you have the right size wrench for your vehicle’s lug nuts. Some vehicles may require a specialized tool, so consult your owner’s manual if you’re unsure.
Wheel chocks or blocks are used to prevent the vehicle from rolling while you’re working on changing the tire. Place them on both sides of the front and rear tires, on the opposite side of the flat, to keep the car stable and secure.
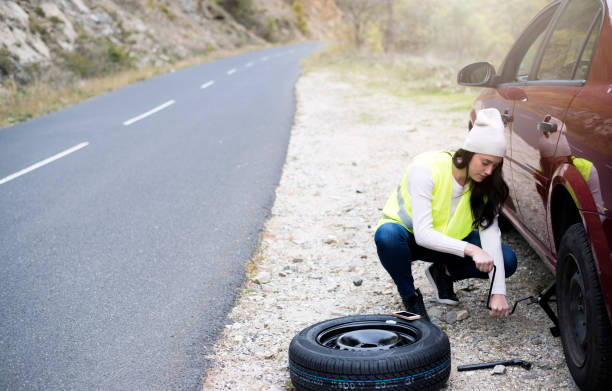
Find a safe, level spot to change the tire, away from moving traffic if possible. Engage the parking brake and set up safety triangles or cones around the vehicle to alert other drivers. This will help ensure your safety as you work on swapping out the flat.
Step-by-Step Guide to Changing a Flat Tire
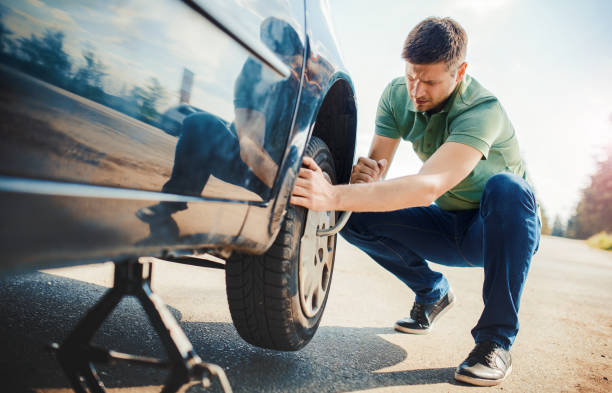
- Loosen the Lug Nuts: Using the lug wrench, loosen (but do not remove) the lug nuts on the flat tire before jacking up the vehicle. This will make the nuts easier to turn later. Turn them counterclockwise about one or two rotations.
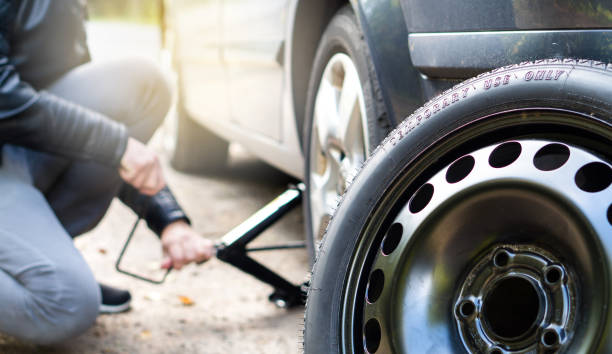
- Position the Jack: Locate the designated jacking point on your vehicle, typically marked by an icon or indentation. Carefully position the car jack under this point and begin raising the vehicle, stopping once the flat tire is just off the ground. Avoid placing the jack on uneven or soft ground, as this could cause it to slip or become unstable.
- Remove the Flat Tire: Once the vehicle is elevated, remove the lug nuts completely and take off the flat tire. Set it aside in a safe location, away from the work area.
- Install the Spare Tire: Place the spare tire on the lug bolts and hand-tighten the lug nuts in a star or criss-cross pattern. Do not fully tighten them yet. This pattern helps distribute the weight evenly and prevent the wheel from becoming misaligned.
- Lower the Vehicle: Slowly lower the vehicle back down until the tire is on the ground, then remove the jack. Be sure to lower the vehicle completely before attempting to tighten the lug nuts.
- Tighten the Lug Nuts: Using the lug wrench, fully tighten the lug nuts in the same star or criss-cross pattern. This ensures the wheel is properly secured. Double-check that all the nuts are tight by going over them a second time.
It’s important to note that the process may vary slightly depending on your vehicle make and model. Always refer to your owner’s manual for any specific instructions or recommendations from the manufacturer.
Tire Changing Tips and Techniques
Before installing the spare tire, be sure to check its air pressure and inflate it to the proper PSI if needed. Avoid over-tightening the lug nuts, as this can damage the threads. When the job is complete, properly store the flat tire and tools in your vehicle.
If you’re unsure about changing the tire yourself or the spare is a “donut” temporary tire, it’s best to call for roadside assistance to have a professional handle the repair. Attempting to drive on a donut for an extended period can be unsafe, as they are only meant for temporary, low-speed use.
Donuts, also known as temporary spare tires, are a compact and lightweight alternative to a full-size spare. They’re designed to get you to a tire shop or your final destination, not for long-term use. Driving more than 50 miles or at speeds above 50 mph on a donut can be dangerous, as the smaller size and lower-quality construction makes the tire more susceptible to failure.
It’s also important to remember that a donut spare is not meant to match the other tires on your vehicle. The diameter, width, and tread pattern will likely be different, which can affect your vehicle’s handling and stability. Use the donut only for the shortest distance necessary to reach a repair facility.
Caring for Your Tires to Prevent Flats

Regular tire maintenance is key to preventing flats and ensuring your vehicle’s safety on the road. This includes:
- Checking tire pressure monthly and inflating to the recommended PSI
- Rotating tires every 5,000-8,000 miles for even wear
- Keeping tires aligned and balanced to prevent uneven wear
- Inspecting tires regularly for signs of damage or excessive wear
Properly inflating your tires is one of the most important maintenance tasks. Under-inflated tires generate excess heat, which can lead to a blowout, while over-inflated tires are more prone to punctures. Check the recommended PSI for your vehicle, which is typically listed on a sticker inside the driver’s side door jamb or in your owner’s manual.
Tire rotation is another crucial maintenance step. By moving the tires to different positions on the vehicle (front to back, side to side), you can ensure even tread wear. This helps maximize the life of your tires and maintain optimal performance and safety. Most manufacturers recommend rotating tires every 5,000 to 8,000 miles.
Wheel alignment and balancing are also important for preventing uneven tire wear. If your wheels are out of alignment, it can cause the tires to wear down prematurely on the inside or outside edges. Balancing the wheels ensures they spin smoothly without vibration, which helps extend tread life.
Regularly inspecting your tires for signs of damage or excessive wear is also vital. Look for cracks, bulges, or cuts in the sidewall, as well as tread depth below 4/32 of an inch. Tires with insufficient tread depth are more prone to hydroplaning on wet roads and have decreased traction in inclement weather.
Replacing worn or damaged tires is also important for safety. Generally, you should replace all four tires together for the best performance and handling. Mixing new and old tires, or tires of different sizes or wear levels, can negatively affect your vehicle’s stability and control.
Emergency Preparedness for Flat Tires
To be prepared for a flat tire emergency, keep a roadside kit in your vehicle that includes a spare tire, jack, lug wrench, flashlight, and safety triangles or flares. You may also want to consider keeping a portable tire repair kit or tire sealant on hand for quick temporary fixes.
A roadside kit is an essential item to have in your vehicle at all times. In addition to the spare tire and changing equipment, it should also contain the following items:
- Reflective safety triangles or flares
- Flashlight and extra batteries
- Jumper cables
- Basic tool kit (pliers, screwdrivers, etc.)
- First aid kit
- Non-perishable snacks and water
- Warm clothing or blankets
Having these supplies readily available can make a big difference if you encounter a flat or other roadside emergency. The safety triangles or flares, for example, can help alert other drivers to your situation and prevent additional accidents.
If you encounter a flat and the spare is not usable, don’t attempt to drive long distances on the damaged tire. Instead, call for roadside assistance to have the tire professionally repaired or replaced. Driving on a flat can cause further damage to the tire, wheel, and suspension components, resulting in a more costly repair.
Some drivers opt to carry a portable tire repair kit or tire sealant in addition to a spare. These products can temporarily inflate and seal small punctures, allowing you to drive to a tire shop for a permanent fix. They’re not a long-term solution, but they can get you back on the road in a pinch.
Keep in mind that tire sealants and repair kits have their limitations. They may not work on large holes, sidewall damage, or completely flat tires. They’re also not a replacement for a full-size spare tire, as they won’t provide the same level of stability and safety for continued driving.
Frequently Asked Questions (FAQ)
Q: What are the most common causes of flat tires?
A: The most common causes of flat tires include punctures from nails, screws, or other sharp objects, general wear and tear on the tire over time, and underinflation. Underinflated tires are more susceptible to damage and can lead to a blowout.
Q: How can I identify if I have a flat tire?
A: You can identify a flat tire by visual signs like the tire appearing lower than the others, or if it feels soft and spongy when you press on it. You may also hear a hissing sound indicating air is escaping.
Q: What tools do I need to change a flat tire?
A: The essential tools required to change a flat tire are a spare tire, car jack, lug wrench, and wheel chocks or blocks. It’s also a good idea to keep a flashlight, safety triangles, and gloves in your roadside kit.
Q: How do I properly position the jack to lift the vehicle?
A: Locate the designated jacking point on your vehicle, typically marked by an icon or indentation. Carefully place the jack under this point and begin raising the vehicle until the flat tire is just off the ground.
Q: What’s the correct way to tighten the lug nuts after installing the spare?
A: Tighten the lug nuts in a star or criss-cross pattern, not in a circular motion. This helps distribute the weight evenly and prevent the wheel from becoming misaligned. Be sure to fully tighten the nuts.
Q: Can I drive long distances on a spare or temporary tire?
A: No, it’s not recommended to drive more than 50 miles or at speeds above 50 mph on a spare “donut” tire. Temporary tires are only meant for short, low-speed trips to reach a repair facility.
Q: How can I prevent future flat tires?
A: Regular tire maintenance is key, including monthly pressure checks, tire rotations, and inspections for wear and damage. Replacing worn tires and keeping your wheels aligned and balanced can also help prevent flats.
Conclusion: Be Tire-Ready for the Road Ahead
Changing a flat tire may seem daunting, but with the right tools and a bit of know-how, it’s a skill every driver should have in their repertoire. By understanding the causes of flats, properly preparing, and following the step-by-step process, you can get back on the road safely.
Regular tire maintenance and emergency preparedness are also crucial to prevent flats and handle them smoothly when they do occur. Checking tire pressure, rotating tires, and inspecting for wear and damage can go a long way in avoiding the hassle and potential danger of a flat.
With a roadside kit stocked and the knowledge to change a tire, you’ll be equipped to handle flat tire emergencies with confidence. No matter where the road takes you, being “tire-ready” will help ensure you reach your destination safely and without unnecessary delays.
So the next time you hear that dreaded hissing sound or feel your vehicle start to pull to one side, don’t panic. Put on your safety gear, grab your tools, and get to work. With this comprehensive guide, you’ll be back on the road in no time, equipped to handle flat tires like a pro.
If you have any doubts or queries, feel free to write to us. It would be a great pleasure to help you out.