
Baking your own bread at home is a rewarding and delicious experience that’s gaining popularity among home cooks. Not only is homemade bread tastier and healthier than store-bought options, but the process of mixing, kneading, and shaping the dough can be a calming and satisfying ritual. In this comprehensive guide, we’ll walk you through everything you need to know to become a master of homemade bread baking.
Why Bake Your Own Bread?
There are several compelling reasons to make the switch from store-bought to homemade bread:
- Taste and Freshness: Nothing can beat the mouthwatering aroma and flavor of freshly baked bread straight from your own oven. Homemade bread tastes infinitely better than the pre-sliced loaves found on supermarket shelves. The combination of warm, crusty exterior and soft, pillowy interior is simply unbeatable.
- Healthier Ingredients: When you bake bread at home, you have complete control over the ingredients. You can avoid preservatives, added sugars, and other processed additives found in many commercial breads. This allows you to create healthier loaves that are free from artificial components.
- Cost Savings: Baking your own bread is often significantly more cost-effective than purchasing pre-made loaves, especially if you take advantage of bulk flour and yeast purchases. The initial investment in basic baking equipment can quickly pay off in the long run.
- Sense of Accomplishment: There’s a deep sense of pride and satisfaction that comes from pulling a golden-brown, crusty loaf of homemade bread out of your oven. It’s a skill that’s both practical and rewarding, and the process of creating something from scratch can be incredibly fulfilling.
- Customization and Experimentation: Homemade bread allows you to experiment with different flours, grains, herbs, and other add-ins to create unique and personalized loaves. You can tailor the flavor, texture, and nutritional profile to your specific tastes and dietary needs.
Essential Bread Baking Ingredients & Equipment
Before you can start baking your own bread, you’ll need to gather a few key ingredients and tools:
Ingredients:
- Flour (all-purpose, bread flour, whole wheat, or a combination)
- Yeast (active dry, instant, or fresh)
- Water
- Salt
- Sugar (optional, for feeding the yeast)
- Oil or butter (optional, for added richness and tenderness)
- Milk, eggs, or other dairy (optional, for richer breads)
Equipment:
- Mixing bowls (both small and large)
- Measuring cups and spoons
- Stand mixer with dough hook (optional, but very helpful)
- Bread pans or baking sheets
- Parchment paper or silicone baking mats
- Dough scraper or bench knife
- Oven
- Instant-read thermometer (for checking internal bread temperature)
- Scoring knife or lame (for creating decorative slashes on the bread)
With these basic supplies on hand, you’ll be well on your way to baking delicious homemade bread.
Step-by-Step Guide to Baking Homemade Bread
Now, let’s dive into the step-by-step process for baking perfect homemade bread:
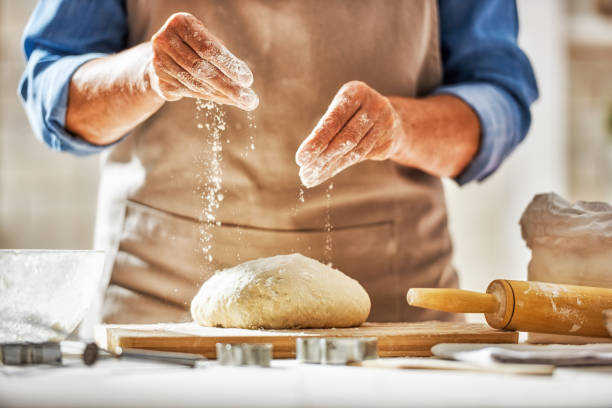
Mixing the Dough
- Bloom the Yeast: In a small bowl, combine the warm water (around 110°F) and yeast. Let the mixture sit for 5-10 minutes until it becomes frothy, indicating the yeast is active and ready to be used.
- Combine Dry and Wet Ingredients: In a large mixing bowl, whisk together the flour and salt. Pour in the bloomed yeast mixture and any additional wet ingredients (such as oil, milk, or eggs) and stir until a shaggy dough forms.
- Knead the Dough: Turn the dough out onto a lightly floured surface and knead for 5-10 minutes, or until the dough becomes smooth, elastic, and passes the “window pane” test (where you can stretch a small piece of dough thin enough to see through it without tearing). This kneading process develops the gluten structure in the dough, which is essential for achieving the perfect bread texture.
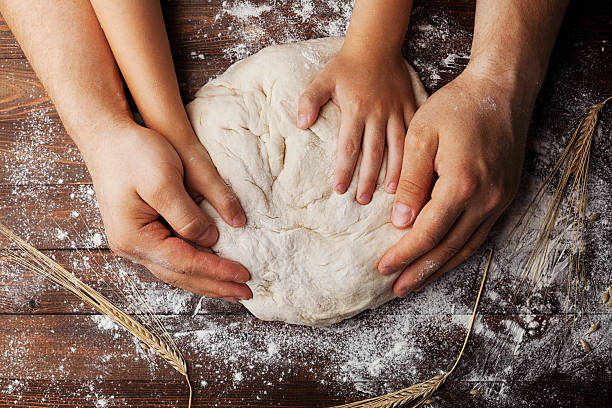
Proofing the Dough
- First Rise: Place the dough in a lightly greased bowl, cover it with a damp towel or plastic wrap, and let it rise in a warm, draft-free area for 1-2 hours, or until doubled in size. This first rise allows the yeast to work its magic, creating air pockets and developing flavor.
- Shaping the Dough: Punch down the dough to release any trapped air bubbles. This step is crucial for creating a uniform, well-risen loaf. Shape the dough into a loaf or rolls, depending on your desired final form. For a loaf, gently stretch and fold the dough into a rectangular shape, then roll it up tightly and pinch the seam to seal.
- Second Rise: Place the shaped dough in a greased bread pan or on a baking sheet, cover, and let it rise for an additional 30-60 minutes, or until it has puffed up considerably. This second rise helps the dough develop its final shape and volume.
Baking the Bread
- Preheat the Oven: Preheat your oven to 375°F (190°C). If you’re using a baking stone, place it in the oven while it preheats to help create a crisp, evenly baked crust.
- Score the Dough: Use a sharp knife or lame to score the top of the loaf, creating decorative slashes. This helps the bread expand properly during baking, allowing for a beautiful, professional-looking crust.
- Bake the Bread: Once the dough has finished its second rise, place the bread in the preheated oven. Bake for 30-40 minutes, or until the crust is a deep, golden brown. Halfway through the baking time, you may want to rotate the pan to ensure even browning.
- Check for Doneness: To ensure your bread is fully cooked, use a digital thermometer to check the internal temperature. Ideal internal temperature for most bread is between 190°F and 205°F. If the crust is browning too quickly, you can tent it with aluminum foil to prevent over-browning.
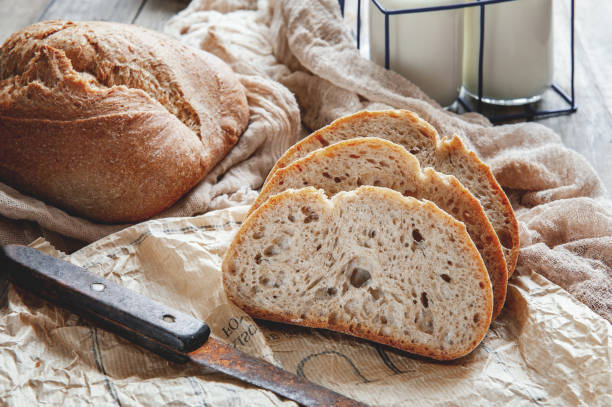
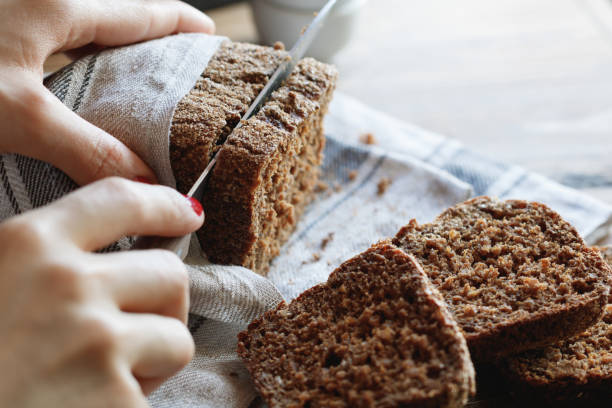
Cooling and Slicing the Bread
- Cool the Loaf: Remove the bread from the oven and let it cool on a wire rack for at least 30 minutes before slicing. This cooling period allows the internal structure to set and prevents the bread from becoming gummy or dense.
- Slice and Enjoy: Using a sharp serrated knife, slice the bread into even pieces. The wait may be agonizing, but it’s essential to let the bread cool completely before cutting into it. Serve warm with your favorite toppings, or store leftovers in an airtight container for up to 5 days.
Common Homemade Bread Recipes & Variations
While the basic bread-baking process remains the same, there are countless delicious variations you can try:

Classic White Sandwich Bread
This is a simple, versatile loaf that’s perfect for sandwiches, toast, and more. The soft, pillowy texture and mild flavor make it a family favorite.
Whole Wheat or Multigrain Bread
For a heartier, more nutrient-dense bread, try incorporating whole wheat flour or a blend of different grains, such as oats, rye, and barley. These breads have a satisfying, chewy texture and a slightly nutty flavor.
Rosemary and Garlic Bread
Infuse your bread with the fragrant, savory flavors of fresh rosemary and minced garlic. This rustic loaf pairs perfectly with soups, stews, and Italian-inspired dishes.
Cinnamon Raisin Swirl Bread
Create a beautiful, spiral pattern by rolling up a cinnamon-sugar filling and plump raisins into the dough. This sweet, tender bread is delicious for breakfast, dessert, or a snack.
Cheesy Herb Bread
Elevate your bread with the addition of shredded cheese and fresh herbs, such as parsley, thyme, or oregano. The melted cheese creates pockets of gooey goodness throughout the crusty loaf.
Sourdough Bread
Cultivate your own sourdough starter to bake tangy, artisanal loaves with a crackly crust and chewy interior. Sourdough requires more time and effort but is incredibly rewarding to master.
No-Knead Bread
For a hands-off approach, try a no-knead bread recipe, which relies on a long, slow fermentation process to develop the gluten structure without extensive kneading. The result is a rustic, bakery-style loaf with minimal effort.
Troubleshooting Homemade Bread Baking
Even experienced bakers can encounter the occasional challenge. Here are some common issues and how to troubleshoot them:
| Problem | Possible Cause | Solution |
|---|---|---|
| Dense, Heavy Bread | – Overfloured dough – Insufficient kneading – Expired or inactive yeast | – Use less flour during kneading – Knead the dough for the full recommended time – Check the expiration date on your yeast and proof it before using |
| Soggy or Undercooked Bread | – Oven temperature too low – Dough not proofed enough – Too much liquid in the dough | – Ensure oven is preheated to the correct temperature – Allow dough to rise for the full recommended time – Reduce the amount of water or other liquids in the recipe |
| Cracked or Misshapen Loaf | – Dough not proofed enough – Oven temperature too high – Bread pan too small | – Let the dough rise for the full recommended time – Lower the oven temperature slightly – Use a bread pan that’s the right size for your dough |
| Dry, Crumbly Bread | – Overbaked bread – Not enough liquid in the dough – Too much flour used during kneading | – Reduce the baking time slightly – Increase the amount of water, milk, or other liquids in the recipe – Use a lighter hand when adding flour during kneading |
| Tough, Chewy Crust | – Oven temperature too high – Dough overproofed – Not enough steam in the oven | – Lower the oven temperature by 25°F – Shorten the final proof time – Place a shallow pan of water in the oven during baking to create steam |
Tips for Storing and Enjoying Homemade Bread

To keep your homemade bread fresh for longer, follow these tips:
- Room Temperature Storage: Store cooled bread in an airtight container or bread bag at room temperature for up to 5 days. Avoid storing bread in the refrigerator, as the cold, dry air can cause it to stale faster.
- Freezing: For longer storage, slice the bread and freeze it in resealable bags for up to 3 months. This helps preserve the freshness and prevents the bread from drying out.
- Reviving Stale Bread: If your bread starts to go stale, you can revive it by sprinkling it with a few teaspoons of water and heating it in a 350°F oven for 5-10 minutes. The added moisture and heat will help restore the bread’s soft, fresh texture.
- Leftover Bread Recipes: Don’t let those last few slices go to waste! Use up leftover bread in delicious recipes like breadcrumbs, croutons, bread pudding, or French toast. The possibilities are endless.
- Bread Dipping Oil: Create a simple, flavorful dipping oil by combining olive oil, balsamic vinegar, and a blend of dried herbs and spices. Serve it alongside your fresh-baked bread for a restaurant-worthy appetizer.
- Bread Salad: Tear or cube stale bread and toss it with fresh tomatoes, cucumbers, onions, and a tangy vinaigrette for a refreshing panzanella salad.
With this comprehensive guide, you’re now equipped with the knowledge and skills to bake truly exceptional homemade bread. Embrace the process, experiment with different recipes, and enjoy the fruits of your labor. Happy baking!
The Science Behind Bread Baking
Baking bread is both an art and a science, with a delicate balance of ingredients and techniques that can profoundly impact the final result. Let’s dive into the science behind some of the key bread-baking principles:
Yeast and Fermentation
Yeast, a living single-celled organism, is the magical ingredient that transforms a simple dough into a light, airy loaf of bread. When activated by warm water and fed with sugar, the yeast begins to consume the carbohydrates, producing carbon dioxide and alcohol as byproducts.
This fermentation process is what causes the dough to rise, as the trapped carbon dioxide bubbles expand and create pockets of air within the gluten structure. The longer the dough is allowed to ferment, the more complex the flavors will become, thanks to the production of various organic acids.
Gluten Development
Gluten, the protein found in wheat and other grains, is essential for creating the chewy, structured texture of bread. When the flour is mixed with water, the gluten proteins begin to align and form long strands, trapping the gas bubbles produced by the yeast.
Kneading the dough helps to further develop the gluten, aligning the proteins and creating an elastic, workable dough. The more the dough is kneaded, the stronger the gluten network becomes, resulting in a higher rise and chewier crumb.
Oven Spring and Crust Formation
When the dough is placed in the hot oven, a phenomenon known as “oven spring” occurs. The trapped gas bubbles rapidly expand, causing the dough to rise dramatically. This oven spring is what gives bread its signature airy interior and crunchy crust.
As the bread bakes, the high heat causes the starches on the surface to gelatinize and caramelize, forming the golden-brown crust. The Maillard reaction, a complex series of chemical reactions between amino acids and sugars, is responsible for the delicious, toasted flavor of the crust.
Hydration and Moisture Content
The ratio of water to flour is a critical factor in bread baking. Too little water can result in a dry, dense crumb, while too much can lead to a soggy, undercooked loaf. The ideal hydration level can vary depending on the type of flour, the weather conditions, and the desired texture of the bread.
Monitoring the bread’s internal temperature is also essential, as it indicates when the starch has fully gelatinized and the proteins have coagulated, signaling that the bread is fully baked. This prevents the dreaded “gummy” center that can occur when bread is underbaked.
By understanding the science behind these key bread-baking principles, you can better troubleshoot any issues that may arise and fine-tune your techniques to produce consistently outstanding homemade loaves.
Conclusion
Baking homemade bread is a rewarding and satisfying experience that allows you to take control of the ingredients, flavors, and textures in your baked goods. Whether you’re a beginner or an experienced baker, mastering the art of bread making can be a fulfilling and delicious journey.
Remember to embrace the process, experiment with different recipes and techniques, and don’t be discouraged by the occasional misstep. With patience, practice, and a keen eye for detail, you’ll be well on your way to producing bakery-quality bread right in your own kitchen. Happy baking!
If you have any doubts or queries, feel free to write to us. It would be a great pleasure to help you out.